
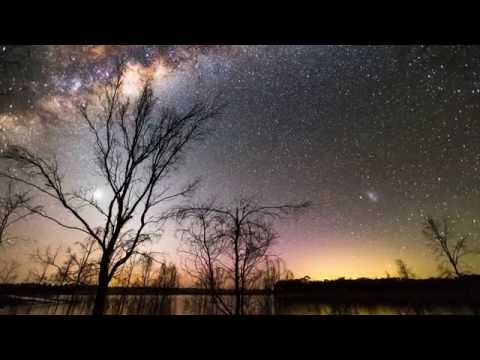
Astrophotography, or star photography, has become increasingly popular among photographers looking to capture the beauty of the night sky. The allure of creating stunning images of the stars, galaxies, and celestial bodies can be a rewarding challenge for both amateur and professional photographers alike. With advancements in camera technology and accessible resources, more photographers are venturing into this niche genre to unleash their creativity and capture breathtaking images of the cosmos.
The art of star photography involves capturing the natural beauty of the night sky through long exposures and meticulous planning. Photographers often seek out dark sky locations away from light pollution to ensure clear and vibrant images of the stars. Armed with specific camera gear and accessories designed for low-light conditions, photographers can bring the magic of the night sky to life in their photographs.
Whether you are drawn to the mesmerizing swirls of the Milky Way or fascinated by the sparkling constellations above, star photography offers endless possibilities for creativity and exploration. From choosing the perfect location to mastering camera settings and post-processing techniques, embarking on a journey into star photography can open up a world of wonder and inspiration for photographers looking to push their skills to new heights.
Equipment Needed for Star Photography
Camera Gear
When it comes to star photography, having the right equipment is essential for capturing those breathtaking celestial moments. The most important piece of gear you will need is a camera with manual settings, as this allows you to have full control over your exposure settings. A camera with high ISO capabilities is also beneficial for shooting in low light conditions. In addition, a sturdy tripod is crucial to keep your camera stable during long exposure shots.
Lenses and Accessories
In terms of lenses, wide-angle lenses are highly recommended for star photography as they allow you to capture more of the night sky in a single frame. Lenses with large apertures (f/2.8 or wider) are ideal for letting in as much light as possible for bright and detailed star images. Additionally, consider investing in a remote shutter release or intervalometer to minimize camera shake and vibrations when taking long exposure shots.
Other Essential Accessories
Apart from your camera and lenses, there are other accessories that can enhance your star photography experience. Carrying a headlamp or flashlight with a red light setting can be useful for adjusting settings in the dark without disrupting your night vision or the natural darkness of the surroundings. It’s also recommended to bring extra batteries and memory cards when venturing out for extended periods of shooting under the stars.
By ensuring you have the right camera gear and accessories, you will be well-equipped to capture stunning images of the night sky in all its glorious splendor through star photography.
Finding the Perfect Location
Star photography, also known as astrophotography, is a captivating and challenging genre that requires patience, skill, and the right location to capture the beauty of the night sky. Finding the perfect location for star photography is crucial in achieving stunning results. One of the key factors to consider when choosing a location for star photography is light pollution.
Light pollution from urban areas can greatly affect the visibility of stars in your photos. To minimize light pollution, it is recommended to shoot in dark sky locations away from city lights.
Remote areas with minimal human activity and artificial lights are ideal for capturing clear and vibrant starry skies in your photographs. National parks, rural countryside, or mountainous regions are great options for finding these remote and pristine locations. Additionally, make sure to check local ordinances or regulations regarding nighttime photography in specific areas to ensure you are allowed to shoot during the night.
Another important consideration when selecting a location for star photography is the weather conditions. Clear skies free of clouds are essential for capturing sharp and detailed star photos. Use weather forecasting tools to plan your shoot on nights with favorable weather conditions.
It’s also beneficial to be mindful of the moon phase when planning your star photography excursion. A new moon or crescent moon phase is preferable as it provides darker skies with more visible stars compared to a full moon which can wash out the starlight.
| Location Considerations | Factors |
|---|---|
| Light Pollution | Avoid urban areas |
| Remote Areas | National parks, rural countryside |
| Weather Conditions | Clear skies without clouds |
Planning Your Shoot
When it comes to star photography, proper planning is key to capturing breathtaking images of the night sky. Planning ahead ensures that you make the most of your time spent shooting and increases the likelihood of getting stunning results. One crucial aspect of planning your shoot is checking weather conditions.
Clear skies are essential for star photography as any cloud cover can obstruct the view of the stars. Monitoring weather forecasts and choosing nights with minimal or no cloud cover can greatly improve your chances of capturing clear, star-filled skies.
In addition to checking weather conditions, keeping track of moon phases is equally important in star photography. A full moon can wash out the visibility of stars due to its brightness, while a new moon offers dark skies perfect for highlighting the beauty of stars.
Timing your photography sessions around new moon phases increases the contrast between the stars and the sky, resulting in more striking images. Utilizing resources like lunar calendars can help you plan your shoots accordingly and maximize your chances of capturing stunning star photos.
Furthermore, referencing star charts is another helpful tool in planning your star photography sessions. Star charts provide valuable information on celestial objects’ positions in the night sky, helping you frame your shots or locate specific constellations for desired compositions.
Familiarizing yourself with common star patterns or interesting celestial events allows you to capture unique and captivating images that stand out. Overall, taking the time to plan ahead by checking weather conditions, moon phases, and utilizing star charts significantly enhances your chances of creating stunning star photography masterpieces that leave a lasting impression on viewers.
- Check weather forecasts for clear skies
- Monitor moon phases to choose nights with minimal light pollution
- Use star charts to locate celestial objects for framing compositions
Camera Settings for Star Photography
When it comes to capturing breathtaking starry skies, understanding the optimal camera settings for star photography is crucial. By tweaking your camera settings correctly, you can ensure that your images of the nighttime sky are sharp, detailed, and visually appealing. Here are some key camera settings to consider when venturing into the world of star photography.
Aperture
One of the most important settings for star photography is aperture. To capture crisp and well-defined stars, it’s best to use a wide aperture (low f-stop number). This allows more light to enter your camera sensor, resulting in brighter and more detailed starry skies. However, be mindful not to use too wide of an aperture as it can lead to distortion and reduce the quality of your images.
Shutter Speed
In star photography, longer shutter speeds are often necessary to capture the faint light of distant stars. Experiment with different shutter speeds but aim for exposures ranging from 10-30 seconds for optimal results. Keep in mind that longer exposures may cause some movement in the stars due to Earth’s rotation, so consider using a tracking mount or applying the “500 Rule” for minimizing star trails.
Iso
Another key setting to consider is ISO, which determines the sensitivity of your camera sensor to light. For star photography, start with a moderate ISO setting (e.g. ISO 800) and adjust accordingly based on your lighting conditions. Keep in mind that higher ISO values can introduce noise into your photos, so strike a balance between brightness and image quality.
By mastering these key camera settings for star photography, you can elevate your night sky shots to new heights. Experiment with different combinations of aperture, shutter speed, and ISO to find the perfect balance that suits your creative vision and captures the stunning beauty of the cosmos overhead. Remember that practice makes perfect in star photography – so get out there under the night sky and start shooting.
Techniques for Capturing Stars
Star photography offers a unique and mesmerizing opportunity for photographers to capture the beauty of the night sky. One of the key techniques used in star photography is long exposure photography. By using a long exposure, photographers can gather more light from the stars, resulting in stunning images with bright, vivid stars streaking across the sky. Long exposure photography also allows for capturing star trails, creating a sense of movement and dynamism in the final image.
Another technique commonly used in star photography is stacking. Stacking involves taking multiple photos of the night sky and combining them together to reduce noise and enhance details. By stacking multiple images, photographers can create cleaner, more detailed images of the stars and minimize the impact of any noise that may be present in individual shots. This technique is particularly useful when shooting in areas with light pollution or lower visibility.
Composition plays a crucial role in star photography as well. When framing a shot of the night sky, photographers must consider various elements such as foreground objects, framing, and leading lines to create a visually appealing composition. Including interesting foreground elements can add depth and context to an image of the starry sky, making it more engaging for viewers. Experimenting with different compositions and angles can lead to unique and captivating star photos that stand out from the rest.
| Techniques | Details |
|---|---|
| Long Exposure Photography | Gathering more light from stars for bright images; capturing star trails. |
| Stacking | Combining multiple images to reduce noise and enhance details. |
| Composition Tips | Including foreground objects; experimenting with angles for unique shots. |
Editing Star Photos
When it comes to star photography, the work doesn’t end once you’ve captured the perfect shot. Post-processing is a crucial step in bringing out the best in your star photos. One common issue in astrophotography is noise, which can detract from the clarity of your starry sky. Using noise reduction techniques in editing software such as Adobe Lightroom or Photoshop can help clean up your images and provide a smoother appearance to the stars.
Another important aspect of editing star photos is adjusting exposure. Sometimes, the initial exposure settings may not fully capture the beauty of the night sky. By playing around with exposure levels during post-processing, you can enhance the contrast between stars and deepen the overall colors present in your image. This step can truly make your stars pop and create a more visually appealing photograph.
Enhancing details in your star photos can make a significant difference in the final result. Through sharpening tools and adjustments to clarity and contrast, you can bring out finer details in individual stars or constellations. This process adds depth to your image and ensures that every element of your starry landscape stands out. Experimenting with different editing techniques will allow you to find a style that suits your vision for each star photography project.
- Utilize noise reduction techniques for cleaner-looking star photos
- Play with exposure levels to enhance colors and contrast
- Focus on enhancing details through sharpening tools and adjustments
Inspiration and Examples
In conclusion, star photography presents an exciting and rewarding challenge for photographers looking to capture the beauty of the night sky. With the right equipment, location, planning, camera settings, and techniques, stunning starry skies can be captured in all their glory.
Finding the perfect dark sky location away from light pollution is crucial to achieving clear and vibrant star photos. Additionally, careful planning ahead of time by checking weather conditions, moon phases, and star charts can greatly increase the chances of a successful shoot.
Experimenting with different camera settings such as long exposures and stacking techniques can result in breathtaking images of stars streaking across the night sky. The post-processing phase is equally important in enhancing the final look of star photos, through adjustments like noise reduction and exposure tweaks. By drawing inspiration from experienced photographers and studying their work showcased in stunning star photography examples, aspiring photographers can continually improve their skills and refine their craft.
Overall, investing time and effort into mastering the art of star photography is truly worth it when you witness the awe-inspiring results captured in your own images. Whether highlighting individual stars or capturing sweeping views of the Milky Way galaxy, star photography offers endless opportunities for creativity and exploration under the vast canvas of the night sky.
Embrace the challenge, unleash your creativity, and let yourself be guided by the wonders of star photography to create captivating visual masterpieces that will leave viewers gazing up at the stars in wonderment.
Frequently Asked Questions
What Is Star Photography Called?
Star photography is commonly referred to as astrophotography. It involves capturing images of celestial objects such as stars, planets, galaxies, and the night sky using photography techniques.
What Is the 500 Rule for Star Photography?
The 500 Rule for star photography is a guideline used to determine the maximum exposure time before star trails begin to appear in your images. It states that you should divide 500 by the focal length of your lens to get the approximate maximum exposure time in seconds.
How Do You Photograph Stars?
To photograph stars, you need to choose the right location away from light pollution, preferably on a clear night with minimal clouds. Use a tripod to keep your camera steady and set a wide aperture (low f-stop) to let in more light.
Adjust your ISO and shutter speed accordingly, focusing on infinity for sharp results. Experiment with different settings to capture stunning starry skies.

An avid outdoor enthusiast, writer, and environmental advocate who has spent over two decades exploring the world’s most breathtaking landscapes. With a background in environmental science and a passion for adventure, Frances combines her love for nature with her talent for storytelling to inspire others to embark on their own outdoor journeys.


